Sunday, May 29, 2011

Found this on my camera


And just in case you were wondering.... yes it is a Cowboy-Ninja-Snow-Fighter-Princess-Girl, ....or so I've been told.
She and her brother decided to have a photo-op with my camera I guess.
I have to admit it was a funny surprise when I downloaded the latest batch of pictures.
Boy-oh-boy do these guys keep me guessing!

Have you seen this?


This YouTube video has my kids walking around the house saying, "Faaa-C-T-h".
And it makes me giggle.


Thursday, May 26, 2011

Clearly Cute Card Keeper Tutorial - clear vinyl pockets with fabric slip-cover


As promised this is the second of my tutorials for card keepers featuring vinyl pockets.
I love this card keeper because it is in my opinion
unique!
The dual pocket single fold wallet sewn from vinyl keeps your cards in top-notch condition while allowing them to be visible.
Perfect for your I.D. or your beautifully creative business cards.


And, the fabric sleeve gives you the chance to show a little more of your personality and individuality while also protecting and containing your cards.
Plus
The sleeve easily can be adjusted to carry just cards on their own or a small notebook, or you could even slip a travel size facial tissue inside to keep those pesky purse crumbs out!

(Measurements to make the slip-cover/sleeve to use on it's own with cards will be given at the end of the tutorial.)

Alright, enough yapping! Let's get started.


Supplies:
  • vinyl (cut 1: 5 1/4" x 4",  cut 2: 2 1/2" x 4")
  • fabric scraps (Outside Fabric: cut 1: 6 1/2" x 4 3/4", Lining Fabric: cut 1: 6 1/2" x 5 1/4")
  • Rotary cutter and/or scissors
  • Pins
  • Thread
  • Scotch Tape


Part 1 - the vinyl pockets
With your vinyl rectangles cut to 5 1/4" x 4",  and 2 at 2 1/2" x 4"
Lay them out as pictured above matching corners and keeping sides even.
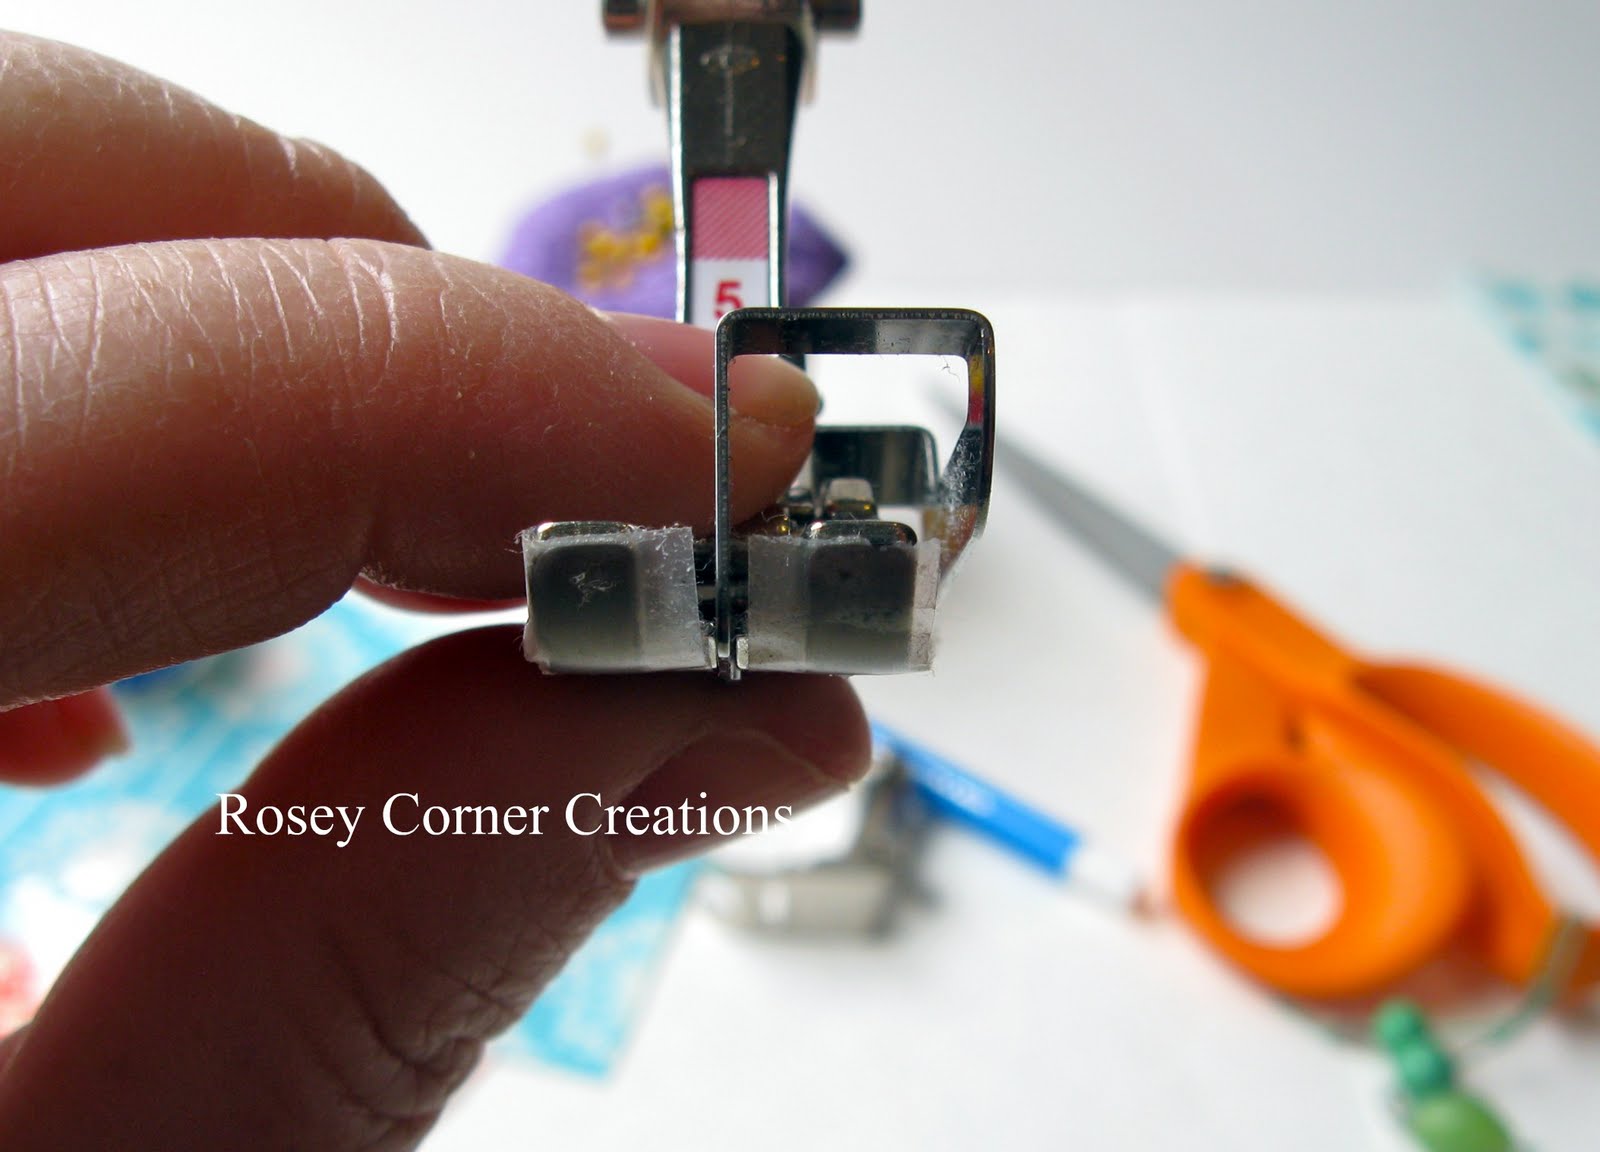
Use the tape technique I explained in this tutorial, make sure to lengthen your stitches just a little and to move your needle all the way to the left if you're using a blind hem pressure foot,
sew around the perimeter of the vinyl. (Don't forget to back stitch at the beginning and the end.)
That's it!
Simple isn't it?


Part 2 - Fabric Slip-Cover/Sleeve:
You should have two pieces of fabric cut as follows:
Outside Fabriccut 1: 6 1/2" x 4 3/4", 
Lining Fabric: cut 1: 6 1/2" x 5 1/4"

Lay out your fabric right sides together having the 6 1/2" sides together and pin.
You will notice that the lining is 1/2" longer than the outside fabric.
That's just the way we want it.

Sew along your pinned, 6 1/2" edge using a 1/4" seam allowance.


Open up the pieces you just sewed.
With the right side of the fabric down press the seam allowance toward the lining fabric.


Fold the fabric in half with the right side of the fabric out, matching all unfinished edges.
And press.
There should be 1/4 of the lining fabric showing on the side with your outside fabric.
If you'd like to you can now top stitch close to the folded over top edge of your fabric.


Fold your rectangle in half, sandwiching in the middle your outside fabric.
Match the unfinished 4 3/4" sides, corners and unfinished bottom.
Pin and sew again using a 1/4" seam allowance.


Trim your bottom corners.
You can now serge or zig-zag the seam allowances.
Trim excess threads and turn right side out.
Use a blunt pencil or a chopstick to push out the corners.

And you're done.
Easy as can be!


Measurements for Card Sleeve on its own:
Outside fabric: 6" x 4 3/4"
Lining fabric: 6" x 5 1/4"

 Note: 
VickiT, a reader commented on my previous tutorial that if you don't want to put tape on your pressure foot you can use tissue paper or heirloom stabilizer to reduce the drag of the vinyl on your machine and pressure foot. After sewing you simply tear away the tissue paper.
Thank you Vicki for the fantastic suggestion.

I've tried tissue paper but I've never tried heirloom stabilizer. I'll have to try it out.
If you choose to try out the tissue paper when sewing with vinyl I'd suggest you use the thinnest tissue paper you can so it tears away easily and so you can see through/around it so your sewing is still straight. If anyone tries the heirloom stabilizer please let me know how it goes for you.

Also, If you are worried about a sticky residue being left on your pressure foot here's a tip.
After removing the tape rub some olive oil on the bottom of the pressure foot, you can even add a little bit of salt to help scrub the sticky off then wash with liquid dish soap. (This works great to get price tag residue off of the glass in picture frames too.)
But just so you know I haven't had the scotch tape leave any sticky residue on my pressure foot.

There was a question about where to purchase the vinyl.
I found mine at Wal-mart but I know it's available at most fabric stores like JoAnn's and Hancock Fabric. It was on a long roll close to the cut counter and was pretty inexpensive. The clear vinyl comes in different thicknesses. I chose a medium thickness. Different thicknesses have different color printing on the paper with them. You can see in the picture the color of mine but I'm not sure what it's called exactly.

I hope this helps. If you have any other questions please don't hesitate to ask!  

Wednesday, May 25, 2011

end of year Teacher Gifts

photo from Martha Stewart Crafts
Our school year ends next week.
It seems like only yesterday I was posting THIS.
The year has gone so fast......
Nevertheless today I find myself contemplating Teacher Thank You Gifts.


photo by This Present Life
Or
A Ruffled Checkbook Cover might be nice.
Tutorial by 2 Little Hooligans Here.
But I found the tutorial through This Present Life Here.


I'm also considering making a utility apron.
Tutorial found Here.
They are useful for teachers after all.

I really need to decide soon....I only have 7 days.

What do you think?

What are you going to do for the teachers in your life?

Any ideas for gifts for the teachers of the Mister variety?

I'd love to hear from you.

Monday, May 23, 2011

Too Cute Card Keeper with clear vinyl pockets Tutorial


This project was born because I wanted to make something for the young women I work with at church.
I thought a small wallet for them to keep their ID in and a pocket version of a pamphlet that reminds them of their standards and values would be nice.
After I finished sewing 20 of them I decided they would work perfectly to carry business cards in as well
and/or
gift cards
credit cards
club cards
So many options....so little time!


And they are so so simple to make. 
Seriously,
I sewed 20 in a little over an hour!
No Joke!
Really the only tricky part is sewing on vinyl but I have a super secret technique to share that makes it simple as can be.

Would you like to make one too?
Or possibly 20?

Lets get started.


Supplies
  • Fabric scraps - 2,  6" x 4 1/2" pieces
  • Clear vinyl - 2,    3 3/4" x 2 1/2" pieces
  • Thread (coordinating)
  • Scissors
  • chalk pencil or something to mark fabric (optional)
  • scotch tape (not optional)
  • blind hem pressure foot (for sewing machine)
  • pins
  • iron
  • chopstick or blunt pencil


Pin fabric right sides together
Sew all the way around the perimeter using a 1/4 seam allowance.
Leave a 2 inch opening near the middle of one of the long sides.
Trim excess fabric from corners.


Turn right side out.
Use a chopstick to push out corners.

Press with an Iron, making sure opening edges are turned in and even.

With the outside of your card keeper facing up find the center of the rectangle (should be about 2 3/4" in) and draw a line across using your chalk or pen. 

Top stitch over the center line you drew (lengthen your stitch for a cleaner looking top stitch).
Fold the rectangle in half along the center stitch line and press.


Now for my Super Secret, Super Tricky Vinyl Sewing Technique!

Scotch Tape.

Yes you heard me.
Scotch Tape.

Sewing on vinyl can be hard because it sticks to your pressure foot and then your fabric tries to go through normally but the vinyl stays were it was and you have a big ol' uneven mess.

But
if
you
put scotch tape on the bottom of your pressure foot covering the metal the vinyl won't stick to it.
I've read that a Teflon pressure foot will do the same thing but this works for me and is much less expensive.

So in the following picture I cut a small piece of tape and lined it up and stuck it to one side of the pressure foot and then trimmed off the excess. Then I did the same thing to the other side.
I made sure to leave  an opening where the needle could go through without having to go through the tape.
This pressure foot is my Blind Hem Foot (which I love for top, edge stitching).


To sew the vinyl pockets on you simply line up the edges of the vinyl with the edges of your fabric rectangle. 
Use the metal bar in the center of your pressure foot as a guide. 
Move your needle all the way over to the left position.
 Lengthen your stitch and top stitch the vinyl into place.
Each piece of vinyl will be stitched down on three sides leaving the center sides open to insert your cards.


Voila'! 
You're done!
Not too bad. Right?


I also made another version.

It's an all vinyl card holder with a fabric slipcover.

I'm going to try and have a tutorial up for this one in a day or two.


Happy Sewing!

Update!

The second tutorial is up and running.


Friday, May 13, 2011


We've been a bit consumed in this household with a production of The King and I this week.
Two of my children are experiencing the wonderful world of Musical Theatre.
With dress rehearsals Tuesday and Wednesday, then performances Thursday, Friday and Saturday as well as end of level testing in school this week and a Choir concert on Monday our family's nerves are paper thin. But we're hanging in there.
Our church is putting this musical on. Their goal is to provide good family entertainment....and so it's free to attend!
I watched their first performance last night and I was amazed at the level of talent there on that stage. This was not a thrown together production, it was well thought out and well executed.
I have to say that all of that practicing has paid off!
And I'm amazed at the level of dedication shown by everyone involved.


My part has been minimal.
I helped with a few costumes.
But I'm proud to have my children involved with all of these wonderful people.
What a great experience this has been for them.
So, here's my public
Thank You! to all those that have made this possible.


Monday, May 9, 2011

impromptu project

Let me start with two facts.
I love the Internet and the myriad of people who are willing to share their fabulous ideas - for free!
and
I love my great friends and their willingness to share their great ideas and the great ideas they find on the Internet with me.

This very quick project inspiration came to me by way of my friend Shonda,
The process was developed by Infarrantly Creative,
Digital picture available from Lil' Luna,
And picture printed at Costco

Finally, the frame and mat were obtained at our local thrift store. They were circa early 90's and the mat in particular was trendy early 90's colors....not my favorite right now. 
(Sorry, I was too excited to get started so I didn't take any before pictures.)
But they just got a make-over with some Krylon satin black spray paint.
So fast and easy.
The only hard part was keeping the cotton from the cottonwood trees from sticking to the wet paint.


For the photo I used spray adhesive to attach it to some foam board cut to fit in the frame.
Then I spread mod-podge over the photo laid a piece of canvas over the photo and mod-podge and pulled it off leaving the imprint of the grain of the fabric giving the look of the photo  being printed on canvas.
Infarrantly Creative has a detailed tutorial.

My only tip is to indeed follow her advice and use the brush-stroke mod-podge. I only had regular matte finish mod-podge and although it worked fine it didn't hold the detail of the canvas as much as I would have liked.
I'll be doing this again on a family photo and use the brush-stroke mod-podge for sure.


You wouldn't believe how quickly this worked up and I love it!
This picture is going to be a part of a grouping for my living room.
I want to have this room all decorated and acting as a formal living room by Sept. We've lived here for 2 1/2 years now and it's time I decorated!
I'll keep you posted on the progress.

In the meantime I'll be adjusting a dress for Banana to wear to her choir concert tonight. (it was my mom's dress and she looks beautiful in it...Banana's choir is singing songs from the musical Hairspray.)
Also, I need to pick up black color hairspray and dark make-up for Doodle and Banana who are a part of a local production of  the King and I put on by our church this week......we'll see how well I can make my two extremely white skinned, blond and red headed children look like they have beautifully colored Asian skin and hair.
Wish me luck.