After I finished I thought it might be good idea for me to share how I make mitred corners on a hem.
This technique can also be used as a binding for blankets and burp cloths.
And the bonus is they're not hard at all to do.
Let's get started.
Before you begin you need to decide what size of a hem you would like to have or at least how much of a hem you'd like to have showing.
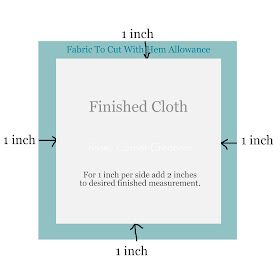
In this demonstration and for my table cloth I decided I wanted to have a 1/2 inch hem showing on the underside and so I added 1 inch to each of my sides for the hem.
Example: If I was making a napkin and I wanted the finished napkin to be 14 inches x 14 inches I would cut the fabric 16 inches x 16 inches.
On the wrong side of the fabric fold each side down 1 inch and press with a steam iron to create a crease.
Measure 1 inch out and 1 inch down from the corner, mark with a pencil both spots.
1 inch out and 1 inch down should be right at the corners of the creased square.
Connect the dots and draw a diagonal line.
Cut along the diagonal line.
At the point of the triangle draw another diagonal line.
Fold the fabric down along this line and press to create another crease.
Now fold the raw edges under to meet the original fold line.
The 1 inch hem should now measure 1/2 inch.
Press with steam iron.
Stitch close to the inside edge.
I like to increase my stitch length to 4.
At the corner leave the needle in the fabric (down position), lift pressure foot and rotate fabric.
Sew completely around the project and don't forget to back stitch at the beginning and ending.
Now, how this would work for a blanket or burp cloth is pretty simple.
I love to make blankets with minky fabric on one side and a fun cotton print on the other.
(Except I usually like to have a larger hem/binding, finished hem 1 inch showing, add 2 inches per hem or 4 inches per finished measurement.)
Prepare the hem of cotton fabric as explained above.
Before stitching...
Cut the minky or flannel the size desired for the finished product.
Open out the folded hem/binding.
Lay the minky/flannel wrong sides together with the cotton.
Match corners and fold the back over the raw edges of the minky/flannel.
(please ignore the nasty hair that made its way into the picture. I think I'm shedding. yuck!)
If I'm making a blanket I like to sew a little "x" or square in the center of the blanket to keep the front and back from separating and sliding.
For a burp cloth I usually don't.
You don't have to use a sewing machine to stitch the hem in place. You can always do it by hand with a slip stitch, which looks nice but takes time too.
Good luck. Let me know if you have questions.


Wow! Thank you soooo much for this tutorial, it is by far the easiest to follow tute on mitred corners I have come across, I am new at sewing and I think I can follow this with no problem!
ReplyDeleteTHANK YOU! you just made my day.
ReplyDeleteThis is simply Devine. THANKS!
ReplyDeleteThank you for clear and practical instructions!
ReplyDeleteThe easiest, yet accurate, mitred corner I have seen.
ReplyDeleteVery thorough tutorial, thank you!!
ReplyDelete