Showing posts with label project. Show all posts

Wednesday, February 27, 2013

It Was Rattling So Loud I Couldn't Think!


Have you ever done that?
Had something rattling around in your head you wanted to make/do but you just didn't have the time so you kept putting it off? But you just couldn't keep your mind off of it.
So it just keeps rattling and nudging and knocking....until finally.....you've had enough!

Yesterday I got most of what I needed to do, done, and so I did what I wanted to do.
I sewed this little tote out of my brain and into existence.


Complete with pen pockets and another pocket for who knows what....chewing gum maybe?


Maybe one of the reasons I like to sew is because it gives me time to think.
Sometimes when I sew I feel like I'm doing mental gymnastics trying to figure out how everything will fit together.
And other times my mind just floats from one subject to another.
'My youngest's first ear infection'
'My oldest's upcoming date'
'The lesson I'll be teaching in church in a couple of weeks'
'Chocolate!'
'Failure'
'Trying again'
'Straight seams'
'Books'
'Music'
'Dinner'

A cacophony of thoughts that somehow ends with me feeling more ME.


I have lots of ideas.
Some don't work out so well.
Of course I don't usually take pictures of those but believe me there have been plenty.
And when they don't work out I remind myself that it's ok....I learned something....or a lot of somethings.
And when an idea does work....(like this little charcoal and tangerine combo)... the feeling is oh, so sweet!


So here's to rattling ideas that workout or not and time to devote to doing something you love!

Happy Wednesday!


P.S. My sweet little tote is available in my shop HERE.

P.P.S. I'm thinking of writing up a tutorial for this. It would include a basic tote tutorial as well as the little extras. Anyone interested?


Tuesday, May 1, 2012

Bleached T-Shirts Take 2....Now that's more like it!


Okay, so my first try didn't go as planned. But that's okay. Live and learn, right?
The second try was so much more what I had in mind.
The thing I love about this project is you don't need to have any fancy cutting machines or equipment.
And it's quick, easy, fun and inexpensive.
Perfect in my opinion!

Let me walk you through it.


Supplies:

  • A colored T-shirt (Yellow doesn't work very well)
  • Bleach
  • Small Spray Bottle (a travel hairspray bottle worked perfectly)
  • A design (I got mine from www.picmonkey.com )
  • Clear or light colored contact paper
  • Sharpie (permanent marker)
  • Scissors
  • Tape
  • Plastic Bag
  • Rubber Gloves (not mandatory but nice to have)
  • Well ventilated area


I started by printing a design on regular paper and then taping it to a window.
I then taped a piece of clear contact paper over the top of the design with the vinyl side facing me.
I traced the design onto the contact paper.


In this picture the design was traced onto the paper not the vinyl but believe me it's a lot easier if you trace it onto the vinyl.

After the design was traced I simply cut it out with the scissors, peeled off the paper backing and placed it on the t-shirt where I wanted it.


I made sure I was wearing old clothes and shoes and moved the shirt outside where the bleach couldn't get on anything important.
However, I did not wear rubber gloves and my hands are paying the price.
Bleach is a VERY potent chemical and should be treated with respect. My hands have been cracking and bleeding since doing this craft with-out gloves. So don't do it!

Also, if you don't want the bleach to bleed through to the other side of the shirt put some plastic or an old towel between the front and back layers of the shirt.


Now comes the fun part!

With your spray bottle lightly squirt the bleach 4 or 5 times over your design.
And then wait a minute. The bleach won't look like it's doing anything for a minute but believe me it is.
Suddenly the bleached spots will show up.
Now you can decide if you want to bleach some more. If you do, spray a couple more times and then wait again.


Once you have the design the way you want it let it dry for a few minutes.
Then remove the vinyl, rinse in the sink in cold water and wash in the washing machine or dry in the dryer.

That's it!


This was a very easy, inexpensive and fun craft to do with the Young Women I work with.

And it really made me happy to see how excited they were about their creations!


Good luck and I'd love to hear if you decide to try it!!!


Tuesday, April 10, 2012

That's What I Get for Thinking


I was so proud of myself.
I thought I'd finished her Easter dress weeks in advance and it hung in the closet patiently waiting for its big debut.
I thought the Saturday evening before Easter would be spent relaxing and enjoying my family.
(Usually I put off the sewing of the dress until the day before and then I have to stay up late sewing.....)
Not this year though!
After the younger kids were in bed I checked on the dress and realized--------
I HADN'T HEMMED IT!  What? Really? UGH!!!
I guess in my mind the zipper was in, the sleeves were in, the dress was finished.
So around 10pm I headed to the sewing machine and hemmed her dress......then made a skirt for my older daughter, I was sewing anyway, might as well.
I guess being prepared is over-rated.... and I'm destined to be a last minute sew-er forever.

P.S. the little girl loved her dress.....can you tell? And the big girl loved her skirt too.
They both looked beautiful, if I do say so myself.


Friday, January 27, 2012

It's what I do in the winter....


When January rolls around I crochet.
I've been like this for years now. If you want to get specific, 14 years. 
That's when I was pregnant with my second. I found this beautiful, soft, blue yarn with a blanket pattern and instructions printed on the label and I decided he needed a crocheted blanket.
I worked away with my hook and the endless string of blue, indescribably soft yarn.
It kept me warm.
And I enjoyed many evenings after my oldest was in bed listening to music while my husband studied away (he was in college then) methodically creating that blanket.
Months later it became one of his favorite and without a doubt one of mine too.
That blanket made it through 3 boys, believe it or not. Now it sits in a box in storage, we'll see what kind of shape it's in 10 - 15 years from now when I find myself a grandma.......hmmm....that's a weird thought.


Anyway, it's January and I find myself seeking the warmth and relaxing comfort of crocheting.
Check out what I made yesterday!


The pattern is from Little Abbee shop here.
I purchased two other patterns that I'm excited to try out.


Now to decide what I'm going to do with this little cute cap confection.
Yep, I'm done with the babies at my house, except for the baby doll variety. (I hope this picture isn't too creepy. It's what I have to work with.)
I started and ended having babies early so I am done and done! But my friends aren't......decisions, decisions.


P.S. I've been thinking of doing a crochet week here on the blog.
I thought I might share a couple of patterns I've written, share a tutorial on crocheting an edging on a fleece blanket and maybe a couple of other things.
What do you think?


Monday, November 28, 2011

Pinterest Inspired Me

Yes it did!
I was inspired by THIS.
(See photo and link at the end of this post)


So this summer I picked up a few wooden bowls at the thrift store for .25 - .50 cents a piece.
And then I searched and searched for wooden candle sticks at the thrift store.
I don't know if others were buying them all up because they'd seen the same thing on Pinterest as I did or what but I never found any!

Finally I found some little ones at the craft store.
And for a little under a dollar a piece I was able to make some cute painted wooden pedestal bowls.

I used some epoxy glue to attach the candle sticks to the little bowls and wooden disks.

I didn't sand the wood first and it didn't take me long to figure out it would have been a lot easier to sand each piece before I glued them together.

Live and learn.


I learned a couple of other things too.
I was concerned that the color of the paint would be affected by the different colors of the wood. So I decided to stain one of the bases first.
Turns out it didn't matter and it actually made it harder for the paint to stick to the wood.
Probably because I didn't let the stain dry for the recommended 8 hours.

I also learned that sanding the wood bowls to get the existing finish off was more important than anything else.


I thought of a couple more things.

Do you remember when I was refinishing a computer armoire and I discovered that you should never spray paint when it's hotter than the recommended temperature?
No?
Check the results out here.
Well,
This time I learned that you shouldn't spray paint when it's colder than the recommended temperature.
The cold also does weird things to the paint.

Good to know, right?


Okay so this little wooden "vessel with the pestle has the brew that is true"(name that movie!)
Is my favorite.  Here's what I did.
First I did a coat of red spray paint, then I did a couple of coats of metallic Carmel latte, then I sanded it down in spots so the red would show through and the wood, then I went over it with walnut stain finally I wiped the stain off and let it dry.
It turned out to be one of my favorites!


This red "flagon" (know the movie yet?) I wanted the wood grain to show through so I did two very light coats of red spray paint and then went over it with the stain as well.

I wanted the grain to show through so I could have it match this.

 This.....is what we lovingly call, "the red thing" and was purchased as one of the best deals of my life.
Someday I'm afraid I'll grow tired of the red but for know I love it!
It stands proudly in our entrance way and as you can see it's a great place to drop keys and mail as you come through the door.
I'm in the process of switching out shelf decor so it looks a little hap-hazard in the pic.

Anyway, I wanted the red flagon to match this so I could bring a little more of the red into the living room.

Finally.....


Here's my green one. I used the same green enamel I used on this project and it had the hardest time going on in the cold. Plus it took For-ev-er! to dry.


I glued the candlestick on upside down on this one and I"m wishing that I hadn't.
But again,
Live and Learn.

Here's my inspiration.
Check out her great instructions.


So I'm wondering if you knew the movie?


You really should.....it's one of my favorite


Tuesday, November 22, 2011

quick up-cycle craft.....baking powder can to coin bank


For weeks now my youngest (4) has been asking me to make her something pink.

She's way into money, counting it in particular.

So when I finished off a can of baking powder it struck me that the little container would make a perfect, 
pink bank for my daughter.

The fact that she could totally help me with this upcycle craft was a bonus.

So here's the thing, there are no during pictures because the batteries in my camera died,
and there were no other charged batteries to be had.
So I charged the ones that were in my camera but my sweet little one was way to excited to finish her bank to wait for the batteries.

So here's the finished product!
and
She loves it!

This project was very simple.
I cleaned out the baking powder and pealed off the label from the can.

We used Mod Podge to apply fabric and extra large ric-rac to the outside of the can.
Then we made rosettes just like these and hot glued them on.
I used an exacto knife to cute a slot for the money 
and that's it!

Simple as can be.


Now my 4 year old can count her money over and over and over again into her coin bank.


What are some of your fun ideas for easy upcycled crafts?


Friday, September 30, 2011

Framed


My project today came from my local thrift store. Don't you love all of the thrifted and up-cycled projects out there. It feels good to be a little green.

I've been pondering purchasing a framed piece of sheet metal to hang on the wall at the bottom of my stairs to the basement.
I thought it would be a great place to hang snapshots and some of the kids papers.
And I wanted it to be easy to switch them out so I thought a magnetic board would be perfect.
However, I've been pondering and pondering and not acting.

I was at the thrift store the other day and stumbled upon this fun chunky oval frame.
It looked as if in a former life it was a mirror with a metal back.
The mirror was gone but the metal backing was still there.
I think you literally could see the light bulb above my head as I thought about the possible futures for this frame and decided it would be perfect at the bottom of my stairs!
And at only $3 I totally scored!

I am the worlds worst "Before" picture taker. I just get too excited to get started and forget.
Sorry, my bad.

So this is the most before I've got.


I decided I wanted to do a fun semi-bright color because the little wall it would be hanging on is pretty dark and not fun. It needed a little life, a little party going on.

When I went to purchase some spray paint this color called to me so I went for it.

I didn't notice it wasn't regular spray paint, it's protective enamel, until I got home.
It went on nice but the dry time was 24 - 48 hrs.
Forever!!!!


I painted some black glaze on the frame and then wiped most of it off with a cloth.
I wanted the flowers to have a little more depth.


I'm pleased with how it turned out.
I've been considering painting the metal backing with chalkboard paint, but I'm not sure yet. I'll keep thinking on it.


Tuesday, September 27, 2011

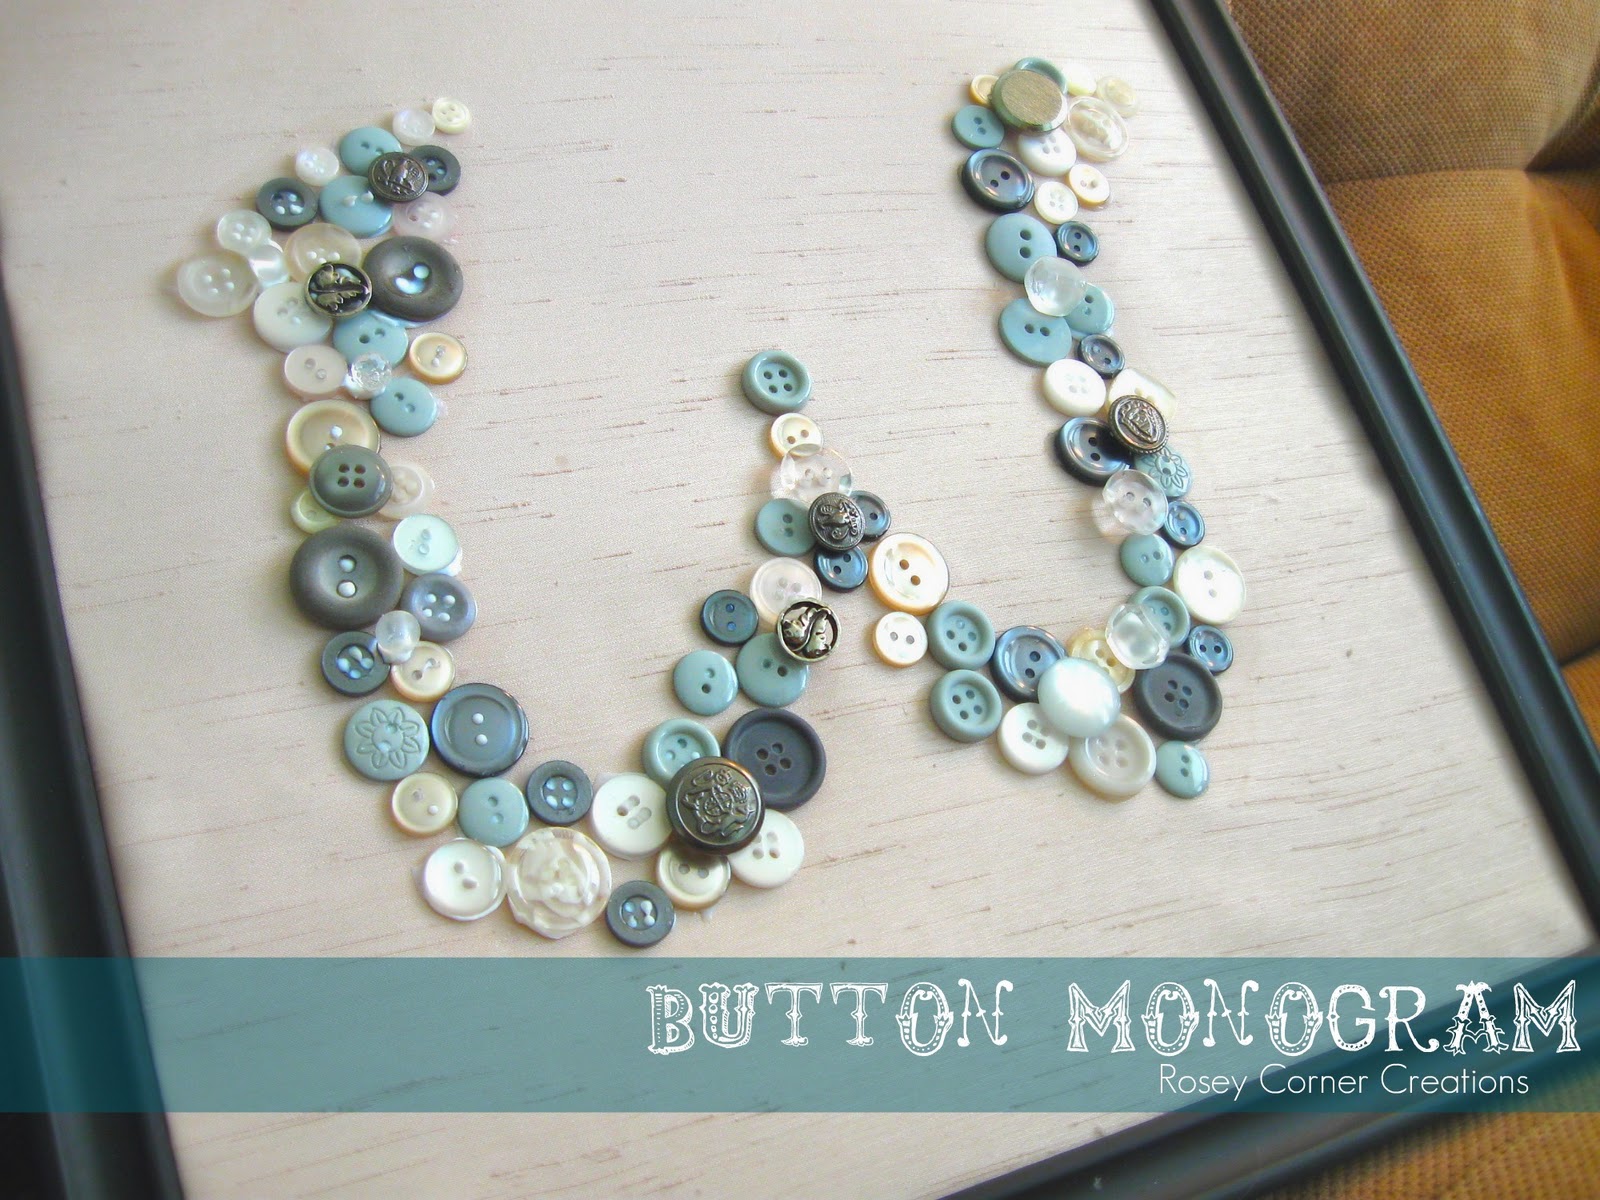
Button Monogram tutorial - More projects for my living room


I don't fancy myself a decorator by any means. But I'm still plugging away at my living room.
I thought I'd share the project I tackled today.
Because I'm a little impatient and because I'm a little excited I'm sharing this before I'm completely finished. I still need to get a mat for it. But you understand right?

And just so you know....the frame I'm using was purchased.....ah-hum....5 years ago, to make a button wreath Christmas wall hanging....it sat for a couple of years in my closet waiting, patiently waiting to be  used. Then it sat in a box for 3 years silently lamenting it's potential gone to waste. But now here it is! in all it's glory, the perfect compliment to my button monogram. Hurrah!!


What you'll need:
Buttons (Lots and Lots of various sizes)
Background fabric (my frame was 12 x 12 so I cut my fabric 15 x 15 so I would have enough fabric to wrap around the back and secure it.)
Frame (no glass needed), backing
Cardboard or poster board cut to fit inside frame -- or you could use the glass from your frame as the insert (Just an idea!)
Spray adhesive
Masking tape
fabric glue (clear drying)
Pencil, Paper

What you do:
Probably best to have your frame and matte before you begin.
On a large piece of paper draw out the dimensions of your frame and matte. Mark your center point.
Either sketch out your letter or print your letter from your computer.
I went with sketching as you can see.
Sort out your buttons and begin laying them out along your outline,
What I think makes this project look really great is to have the buttons close and different sizes of buttons filling in gaps.
I even layered a few.
I had some buttons with shanks that I stuck in small gaps so the buttons were above the other buttons.


Backing:
Find the center of your fabric piece, mark it on the wrong side with a small dot using a pencil.
Find the center of your cardboard insert, mark it with a small dot using a pencil.
Spray the cardboard with spray adhesive following the instructions on the can.
Place the center of your fabric on the center of the cardboard.
Use your hands to smooth the fabric out from the center so you don't have any gaps or air bubbles.


Use masking tape to secure your fabric on the back of the cardboard. My 4 year old was very helpful with this part.
Pretty isn't it?


With your backing flat apply a little fabric glue to the back of each button and then place it on the fabric. Starting with the center and working out.
You can do this a couple of ways.

  1. Working from your paper move one button over at a time. or
  2. Transfer all of the buttons over, make sure your monogram is the way you want it and then glue each button down.
I did the second one. 
I thought about sewing each one one, which would look pretty classy but too labor intensive for me.
Also, I considered using hot glue but then I didn't want to have to deal with all of the glue strings.
So permanent fabric glue is what I ended up using.


Let dry, then insert in your frame and enjoy.
I'll update pics when I get it all finished.


Good luck and enjoy!
Let me know if you have any questions.

Update:
It's finished and hung! I love the way it turned out!